Thursday, March 28, 2013

Ham and Cheese Scones with Photo Tutorial


BOTG - Breakfast On The Go or a key element in the equation of a busy life.

We're all told that breakfast is the most important meal of the day. I agree! I enjoy something for breakfast or brunch everyday. I really enjoyed my two previous recipes (Banana Maple Muffin Tippy Tops and Apple Cranberry Muffin Tippy Tops) so much that I ate them up quite quickly. haha It was time to try something different though. I was inspired, due to a recent baking adventure, to make scones. I had the idea for some savory Ham and Cheese scones to start the day with a cup o java. After a bit of looking around, this is what I came up with.


I am no expert in making scones, that I will admit. One thing I know that is key in successful scones is COLD butter. When the butter cooks it's what makes the delicious explosions inside the pastry. To get the best butter, I do the same thing for pie crust, I use a grater and butter RIGHT out of the fridge. Also, I place the butter in the freezer while I prepare the remaining ingredients. 

I managed to snap a few photos along the prep stages and then a lick your screen worthy photo of the scones from the inside. Delicious! 

Here's the recipe and the photo tutorial follows...

Ham and Cheese Scones
adapted from: CookingLight

Makes 1 dozen scones

Ingredients:

2 cups all-purpose flour
1 Tablespoon baking powder
1/4 teaspoon salt
2 Tablespoon fresh Basil
3 Tablespoons unsalted butter, grated
1 cup cheddar cheese
1 cup small ham cubes
3/4 cup buttermilk
2 large eggs whites

Directions:

Preheat oven to 400º and line baking sheets with parchment paper

1. Whisk flour, baking powder, salt and basil in a large bowl.
2. Add butter and blend with a pasty blender or a fork until well blended (see photo).
3. Add ham and cheese, mix with fork.
4. Combine buttermilk and egg whites, whisk well. Add to pastry mix and stir just until combined.
5. Turn dough onto a floured surface. The dough will be sticky, but no worries. It's supposed to be. Don't go crazy flouring it.
6. Form into a rectangle and cut in half and then into 12 triangles.
7. Place on prepared baking sheets and bake for 15-20 minutes until lightly browned.
8. Serve warm.


Whisk dry ingredients and basil.
Blend in that COLD butter.
Blend in the cheese. YUM!
Mix in the ham cubes.
Combine the buttermilk and egg whites with a whisk. Combine them with the dry ingredients and mix just until moist.
Turn dough onto a floured surface and shape into a rectangle.


Cut dough in half and then into 12 triangles. I used a pizza cutter.

Bake for 15-20 minutes at 400º
Look at that delicious scone! 

Monday, March 25, 2013

Spring Cupcake How To

                 
               Dreaming of this...
...this is what we see.

Even if there are inches of snow on the ground in these early days of Spring, I'm still imagining the scent of blooming flowers and fresh cut grass. Not to mention the array of beautiful colors and new life that Spring brings. Since I can't look outside and enjoy the scenery I want, I decided to make some cute cupcakes to celebrate the days to come!


When I was asked to make a dessert for a Relay For Life event I instantly thought of cupcakes. Perfect treat for people to pick up and they aren't too messy at all. Perfect. Apparently everyone thought they were perfect as well...they sold out! The choice of decoration was obviously well received. The pictures I shared over on Facebook got some love too. The Birdie Cupcake was favored so I decided to put together a quick tutorial on how I made them. 

I used basic decorating tips to make these cupcakes and they truly are simple to do. I did learn that I should have went with my original idea of making the birds out of fondant. I think they would look better by being more round...Next time! haha For now, this is how you can achieve these cute cupcakes. They are perfect for upcoming Easter dinners! 

What you'll need:

- Your favorite cupcakes
- Buttercream or Whipped Frosting, colored as you wish
- Decorating bags with couplers 
- Decorating Tips (2, 3, 12 (all previous are round tips) and 233 (grass tip))
- A little creativity and imagination 

Here are the steps:

Starting in the center and working out swirl the nest and build the sides as you go around the outer edge.

Once you've built the nest, add a little detail by randomly pipping with the grass tip.


Fill a bag with the #12 tip attached with blue frosting. Pipe one bird at a time. It will have a pointy top, you'll fix that in a few steps.

In each nest place three blue birds. After you've pipped all the birds let them dry for a few minutes. To smooth out the pointy tip on the birds, with a glove on, use your finger to smooth it out. Lightly press each tip down. This will leave a base for the itty bitty yellow beak. 


Prepare a bag for the yellow frosting with the #3 tip and reuse the brown frosting by attaching the #2 tip. Pipe the upper and lower parts of the beak on the base impression you made in the previous step. Once you've added the beak to each bird on each cupcake go back and add the eyes. Do so by adding a very small dot. Do not squeeze the bag too much, you don't want to add a blob of brown for the eyes.

This should be your final product. How cute!

I also made some Spring flower cupcakes. These were even more simple. Pipe grass on to the cupcake as the base. Using various tips and colors, get creative and pipe on some pretty flowers. Fun!

Thursday, March 21, 2013

Basic French Toast and Baked Bacon


BACON! 

Who doesn't just love bacon? If you don't, I'm sorry. Bacon has to be one of my favorite things to eat. I don't often eat it, we all know it's not so good for us, but when I do I feel like I'm in heaven. haha What's even better than just bacon? A hearty breakfast of Bacon and French Toast. Give me a bottle of real Maple Syrup and I'm gone. Lost in some other land called foodie heaven. Yum!

As much as I love bacon, I've always hated cooking it. There is, to me, no mess like a bacon grease mess. It gets everywhere, on everything, and cleaning it up is not what I want to do after a healthy serving of breakfast. So, I was pleasantly (I smiled from EAR TO EAR) when I saw someone share this baking bacon trick on Pinterest. I would have never thought. I'm glad someone had this genius idea. It's the easiest way to cook bacon, ever! And the cleanup...rolling up the foil, tossing it in the trash and a quick clean of the pan(s). I can deal with that. Not to mention, the bacon comes out almost perfectly flat. See below. 

I use a half sheet cake pan that I stopped using for cakes. It works perfect.

Yum!

Go on, give it a go. The instructions are below.

In the case of breakfast this bacon needs a pairing. A simple French Toast is perfect! I usually just throw French Toast together, but I figured I'd write my basic recipe and share it. The French Toast pictured above was delicious but only in part to the mix it soaks in. For the first time I used Challah bread (thanks to my significant other for the brilliant idea) instead of Texas Toast. I will never go back to Texas Toast! The Challah bread is slightly sweet and a perfect consistency for French Toast. I recommend tracking it down (or making your own) for this breakfast dish. You won't be disappointed. 


Challah Bread. Look at that baby!


Both recipes are below. Enjoy!


Easy French Toast

Ingredients:

Challah Bread, sliced 3/4-1 inch thick
4 eggs
1/2 cup milk
1 teaspoon cinnamon
dash of nutmeg
Butter
Maple Syrup

Directions:

1. In a medium shallow bowl combine, with a fork, all ingredients but the bread.
2. Soak the bread slices, flip it twice in the batter, one slice at a time.
3. Place 2-4 slices, depending on the size of pan, onto a buttered hot flat fry pan. 
4. Cook just a few minutes on each side until nice and golden brown.
5. Serve warm with butter and real maple syrup.

Baked Bacon

Items Needed:

1 pound bacon
large pan, or 2 9x13
aluminum foil

Directions:

Do NOT preheat oven.

1. Line pan(s) with aluminum foil.
2. Place bacon evenly in pan(s). There will be some overlapping, that's fine.
3. Place pan(s) in cool oven and heat to 400º for 15-20 minutes. *Keep a close eye on the bacon towards the end of cooking.
4. The result you will love! Flat, perfectly cooked bacon and little mess to clean up.

Friday, March 15, 2013

Gma D's Meatloaf w/ Creamy Lemon Pepper Quinoa and Aspargus

I've been putting a little (really not NEAR enough) work into putting together a family cookbook. I posted about this a while back and shared a family cookie recipe. You can find that post here. However, Life has certainly been busy my way and I've failed to do enough work on getting this cookbook together. It's time to change that! 

I'm starting the change right here and right now! Well, really it was a few nights ago that I started, but today is the day I share it. I hope to be working on the recipes, stories, photos, and the book overall in the coming months. I will share a few recipes here simply because I love this food and I want to spread the joy. I have such great memories to go along with the family recipes too. I grew up eating this food, what seemed to be, every Sunday at family lunch. I still love it to this day. 

One version of the book cover.
I've restarted my quest of the family cookbook with a hearty and delicious comfort food meal. I followed the recipe completely, but I added a little topping and delicious sides. Gma D's simple meatloaf was the perfect cold weather fixer comfort meal. It was so delicious I ate ALL of the plate I have photographed below. If you know me, that's out of the norm. It must have been good and I hungry. 


I have a few memories with this meatloaf but I have to say the first one that pops into my mind is not some great story. I can remember being very picky about meat growing up, I used to hate hamburger. One meat I could never fathom eating was deer. Not Bambi! I can't do it! Those were my thoughts and Im not ashamed to share them. (Side note: Curse you Disney for making me cry when I watched your movies! Pure torture. Haha) I just could never imagine eating deer meat. I vividly remember finishing an, as always, delicious Sunday dinner and being asked about the meal. I was asked how much I liked the meatloaf and if I noticed a difference...I was smart kid and knew where this was going after the difference question...then the bomb was dropped...I had eaten DEER MEAT! I completely blacked out and I don't remember a thing! I threw a terrible tantrum and cried for hours. Not Bambi!!

Okay, not really but that sounded like a good ending to the story. I do believe I made comment about Bambi, but it really wasn't all that dramatic. In the end, I enjoyed that meatloaf and that's what mattered. Sorry, Bambi. I have since learned to love some deer meat, but only in summer sausage form. Trust me, I can devour some deer summer sausage with cheddar and jalapeños. Yum! 

I think THIS is the face they got for making me eat deer meat. haha!
On to the recipes now that I've made you laugh, I hope at least a smile. A simple recipe and simple preparation. This isn't the best meatloaf on the planet but I thoroughly enjoyed it as a kid and I still love it to this day. You can't go wrong with a Grandma's cooking! The aroma of it baking brings back many memories of those Sunday lunches with the family. I hope you enjoy the recipe and create some everlasting memories of your own.

An added recipe for you to try is the Creamy Lemon Pepper Quinoa. DElicious! The Asparagus recipe can be found here.

Enjoy! 


Gma D's Meatloaf       [Printable Recipe]

Yields: 1 meatloaf or 3 mini loaves

Meatloaf Ingredients:

1 pound ground beef
1 egg
1/3 cup quick oats
1/3 cup saltine crackers, crushed (I used Ritz)
1/2 cup chopped onion
1/3 cup sliced green onion
1/2 teaspoon salt
1 teaspoon pepper
1/3 cup ketchup
1/3 cup milk

Optional Parmesan Topping:

1/2 cup fresh grated Parmesan Cheese
1/3 cup Panko Bread Crumbs

Directions:

1. Mix all ingredients in a large bowl.
2. Form into a loaf or loaves and place into pan(s).
3. For the last 10 minutes of baking add the topping (simply mix both ingredients in a bowl) and finish cooking until crust is slightly browned.
4. Bake at 350º for 35-40 minutes.

Creamy Lemon Pepper Quinoa        [Printable Recipe]

Ingredients:

1 cup dry Quinoa, tricolor or regular
2 cups water
juice of 1 lemon
zest of 1 lemon
Pepper, fresh cracked is best
1/3 cup heavy whipping cream

Directions:

1. Prepare Quinoa as directed on the package except add the lemon juice with the water.
2. Once the quinoa starts to cook add pepper, to taste, and finish cooking.
3. When the quinoa is done, add the lemon zest and cream. Cook until slightly thickened.
4. Serve warm. This also reheats well and is even better tossed with some sautéed veggies.

Tuesday, March 12, 2013

Banana Bread w Spiced Maple Glazed Pecans


1 banana 2 banana 3 banana 4! Yes, 4 bananas in this recipe! That's a banana per loaf, if you're making the mini loaves.  This banana bread is hearty with a good banana flavor, subtly sweet and full of spiced pecans. I don't really have a go to recipe for banana bread so I thought I would look around and start testing. AND I'll need to keep track of the recipes I use. I failed to save the recipes I've used in the past. 

Simple ingredient list results in a delicious bread.

When I started looking for a recipe I knew that I wanted a basic recipe that I could build on. I feel like I accomplished just that. A few additions and adjustments worked out just as I had hoped, aside from the addition of the maple syrup. While the maple flavor didn't come through as I had hoped, this bread is still delicious. Having glazed the pecans in maple and added some to the batter in place of milk I really thought it would shine through a little more. I still think it adds to the bread, but isn't as pronounced as I would like. The spice was a bit high for what I was going for as well. I made the adjustment in the recipe you see to cut that back. The adjustment will let the other flavors be more balanced. 

Spiced Maple Glazed Pecans. On the right, the chopped pecans for the bread.

The changing weather, cold one day and warm the next, around good ole Indiana made me crave this spicy and subtly sweet banana bread one cool day. Even if it's not cold, this bread makes a great breakfast with a hot cup-o-java or as a delicious snack! 

Enough chit chat form me, go get BAKING!


Banana Bread w Spiced Maple Glazed Pecans            [Printable Recipe] - both recipes at link

Recipe adapted from: http://www.foodnetwork.com/recipes/banana-bread-recipe

Makes: 4 mini loaves or 1 large loaf

Ingredients:

1 cup dark brown sugar
8 tablespoons (1 stick) unsalted butter, room temperature
2 large eggs, room temperature
1 1/2 teaspoons vanilla
4 ripe bananas, mashed
1/4 real maple syrup
1 1/2 teaspoon ground cinnamon
1/4 teaspoon nutmeg
2 1/4 cups all-purpose flour
1 teaspoon baking powder
1 teaspoon baking soda
1 teaspoon salt
1 cup Maple Spiced Pecans (recipe below)

Directions:

Preheat oven to 350 and grease/flour 4 mini loaf pans.

Cream butter and sugar until lighter and fluffy. About 3-4 minutes.

Whisk together the remaining dry ingredients. Set aside.

Once the sugar/butter mix is ready, add eggs one at a time, mixing slightly after each egg. Add the vanilla.

Add the maple syrup just until combined. Add the mashed banana and mix well.

Add the dry ingredients in 3 batches mixing just until combined after each addition.

Pour batter equally into the prepared pans. Bake for 1 hour.


Spiced Maple Glazed Pecans

1 cup pecans halved
1/4 cup Real Maple syrup
1/4 teaspoon cinnamon
Dash of nutmeg

In a small skillet combine all ingredients over medium heat. Cook until maple syrup is thickened. Pour pecans into a wax paper lined baking sheet and cool.

Thursday, March 7, 2013

Rosemary Chicken with Garlic Asparagus

Lately I've become a HUGE fan of cooking simple, fast and healthy meals. I've been succeeding quite well in making them delicious even if they are fast and simple. The best part is they aren't complicated and anyone could make these dishes. The previous Honey Dijon Salmon with Lemon Zested Quinoa was the dish that kicked off this idea for me. I couldn't wait to share that recipe. Again, I can't wait to share this recipe! This dish is even more simple than the Honey Dijon Salmon. Perfect for a hectic day when you've run out of energy to cook. Don't reach for those frozen meals or stop for fast food. Make this! 


Look at that asparagus. SO delicious!

The chicken is juicy and has a great balanced Rosemary flavor. The Asparagus was topped with a Spinach Cream Sauce.
Recipes:


Rosemary Chicken

Ingredients:

2 chicken breast
2 teaspoons dried Rosemary
Olive Oil
Salt and Pepper

Directions:

Preheat oven to 350º

1. Use enough Olive Oil to coat an 8x8 glass dish. 
2. Place the chicken breasts into the prepared pan.
3. Sprinkle salt, pepper, and Rosemary evenly over the chicken breast.
4. Cover with foil and bake for 30-35 minutes until an internal temperature of 165º is reached.
5. Serve while warm.

Garlic Asparagus

Ingredients:

1 lb of fresh Asparagus
2 garlic cloves, chopped
Olive Oil
Salt and Pepper

Directions:

Preheat oven to 350º

1. Wash asparagus and trim off the bottom of each.
2. Place in a shallow baking sheet lined with foil. Sprinkle remaining ingredients over the asparagus.
3. Mix with hands. Place in oven and bake 15-20 minutes.

Let's get social!


Let's get social! Follow me on Facebook or Twitter and get to see more of Creandé. I share more photos and tips on those sites, so come join! 


Tuesday, March 5, 2013

Jack Skellington Birthday Cake

Here is a quick post for the latest birthday cake I've done. The request was a simple Jack Skellington (from the movie Nightmare Before Christmas) cake. I'd say this is pretty good! ;-)

I've also decided to share the photo of the cake before decorating. It was a little crafty work and cutting to put this guy together.


Sunday, March 3, 2013

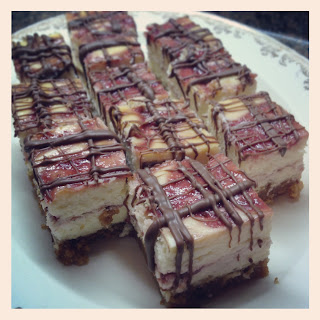
Chocolate Drizzled Strawberry Cheesecake Squares


It was around Valenttine's Day when we, my Valentine and I, were out shopping and noticed some Chocolate Covered Strawberries and instantly started craving some. The next day on my first visit to a Whole Foods store we sampled some cheesecake. Even though I did love the cheesecake, I refused to pay their crazy price when I have a recipe that is just as tasty and costs WAY less.The store certainly left a good impression on me overall for many reasons. I swear it wasn't just the cheesecake sample that won me over! 


A photo from the first batch of squares.

I decided to surprise my Valentine with a take on Chocolate Covered Strawberries. The original plan was to make Chocolate Covered Strawberry Cheesecake Pops, but that didn't work so well. So, I just decided to drizzle the chocolate on the squares. Perfection! In short, that is the story that led to this post. What a post this is for me...


I've always loved be a little helper in the kitchen. I haven't always been camera shy...It's time for a change.
Around my little world and group of friends it's been mentioned numerous times that I should start a YouTube cooking show. I've been SO hesitant to do so. After much thought on my part and conversation with others, I've decided to start taking the steps to get there. It will still be a while before I do a full on show, but I really did enjoy making the following tutorial. That said, I'm still building the confidence to be on camera and record myself giving directions. Have you ever really listened to yourself on a video or audio recording? I think it's so odd, but I'm kind of loving it! 

The following tutorial is the FIRST I have ever done. It's not up to the standards I strive for, but I'm pretty happy with it overall. I have PLENTY to learn in this process and I hope you'll learn right along with me. One of the biggest things to learn is how to be more myself on camera and/or recording. Evoking the positive and fun emotions I have while cooking certainly doesn't pop through as I wish it had in this video. All said, I'm excited (slightly nervous) to share this video. This is just the start of bigger and better things here at Creandé. 


To make the cheesecake grab the recipes below and watch the video. There is also a picture tutorial below showing you how to turn the cheesecake into the squares. Have fun!


Graham Cracker Crust        [Printable Recipe]

yields 2 9" pie crust or one 9x13 glass dish.

Ingredients:

3 cups crumbled graham crackers (about 20 squares or 10 whole grahams)
2/3 cup sugar
12 Tablespoons better, melted

Directions:

Preheat oven to 350º

1. Crush graham crackers. 
2. While butter melts mix sugar into the graham crackers in a medium bowl.
3. Once butter has melted add it to the graham/sugar mixture. Mix with a fork until evenly combined.
4. Press into baking pan(s) or glass dish and bake for 7 minutes. Cool completely.


Strawberry Sauce        [Printable Recipe]

Ingredients:

15.5 ounce frozen strawberries, thawed
2 teaspoons Cornstarch
1 Tablespoon cold water

Directions:

1. Place thawed strawberries in a small saucepan and heat until simmer. 
2. Turn off burner and remove pan from heat. With a stick blender or regular blender…blend the strawberries until smooth.
3. Combine cornstarch and water in a small bowl.
4. Return strawberries to the saucepan and whisk in cornstarch/water mixture. 
5. Cook until thickened. 
6. Cool completely.


Simple Cheesecake        [Printable Recipe]

From: creande.com 

Recipe yields 2 cheesecakes or 1 9x13.

Ingredients:

  • 2 pre-made graham cracker pie shells or crust recipe (here)
  • 4 - 8 oz packages cream cheese, room temperature
  • 1 cup sour cream, room temperature
  • 3 eggs, room temperature
  • 1 cup sugar
  • 1 vanilla bean, seeds scraped or 1 teaspoon vanilla bean paste 
  • 2 teaspoons pure vanilla
  • 3 Tablespoons all-purpose flour


Directions:

  1. Preheat one to 350 and have a pan of water in the oven…see note below.
  2. In the bowl of a mixer combine the cream cheese, sugar, vanilla, and vanilla bean and beat until light and creamy. 
  3. Add the flour to the cream cheese mixture and beat until just smooth.
  4. Add the sour cream and beat until mixed well.
  5. Add eggs, one at a time, until just mixed.
  6. Pour the batter into prepared pie shells. 
  7. Bake for 1 hour to 1 hour 10 minutes. switch oven rack halfway through. Cheesecakes are done when the center is almost set. If the cheesecake starts to crack, it IS done! Not over done, it will still be fine, but it shouldn't crack.
  8. Let the cheesecake cool completely and the refrigerate for at least 4 hours. As hard as it may be to not eat the cheesecakes when cool, they MUST cool in the refrigerator.

Chocolate Drizzled Strawberry Cheesecake Square Tutorial


Steps 1 & 2: Cut the 2 short ends of the cheesecake off. These are curved and won't sit when you try to drizzle them. But! Don't discard them...EAT THEM! haha After that cut the cheesecake into three segments. 

Steps 3&4: Take the cheesecake, a segment at a time, and cut it into two with a hot knife. To get the knife hot, run it under hot water and shake, easily, off the water. Do this after each cut.

Steps 5&6: Cut the segment into quarters and then into 12 pieces.
Step 7: Line the counter with parchment paper. Place squares on a cooling rack. Prepare chocolate.

Step 8: Melt chocolate (I used Wilton Candy Melts)  over a pan of water on low heat.

Step 9: Once the chocolate has melted with a spoon drizzle chocolate over the squares. You can chose to drizzle in an direction.