Thursday, March 7, 2013

Let's get social!


Let's get social! Follow me on Facebook or Twitter and get to see more of Creandé. I share more photos and tips on those sites, so come join! 


Tuesday, March 5, 2013

Jack Skellington Birthday Cake

Here is a quick post for the latest birthday cake I've done. The request was a simple Jack Skellington (from the movie Nightmare Before Christmas) cake. I'd say this is pretty good! ;-)

I've also decided to share the photo of the cake before decorating. It was a little crafty work and cutting to put this guy together.


Sunday, March 3, 2013

Chocolate Drizzled Strawberry Cheesecake Squares


It was around Valenttine's Day when we, my Valentine and I, were out shopping and noticed some Chocolate Covered Strawberries and instantly started craving some. The next day on my first visit to a Whole Foods store we sampled some cheesecake. Even though I did love the cheesecake, I refused to pay their crazy price when I have a recipe that is just as tasty and costs WAY less.The store certainly left a good impression on me overall for many reasons. I swear it wasn't just the cheesecake sample that won me over! 


A photo from the first batch of squares.

I decided to surprise my Valentine with a take on Chocolate Covered Strawberries. The original plan was to make Chocolate Covered Strawberry Cheesecake Pops, but that didn't work so well. So, I just decided to drizzle the chocolate on the squares. Perfection! In short, that is the story that led to this post. What a post this is for me...


I've always loved be a little helper in the kitchen. I haven't always been camera shy...It's time for a change.
Around my little world and group of friends it's been mentioned numerous times that I should start a YouTube cooking show. I've been SO hesitant to do so. After much thought on my part and conversation with others, I've decided to start taking the steps to get there. It will still be a while before I do a full on show, but I really did enjoy making the following tutorial. That said, I'm still building the confidence to be on camera and record myself giving directions. Have you ever really listened to yourself on a video or audio recording? I think it's so odd, but I'm kind of loving it! 

The following tutorial is the FIRST I have ever done. It's not up to the standards I strive for, but I'm pretty happy with it overall. I have PLENTY to learn in this process and I hope you'll learn right along with me. One of the biggest things to learn is how to be more myself on camera and/or recording. Evoking the positive and fun emotions I have while cooking certainly doesn't pop through as I wish it had in this video. All said, I'm excited (slightly nervous) to share this video. This is just the start of bigger and better things here at Creandé. 


To make the cheesecake grab the recipes below and watch the video. There is also a picture tutorial below showing you how to turn the cheesecake into the squares. Have fun!


Graham Cracker Crust        [Printable Recipe]

yields 2 9" pie crust or one 9x13 glass dish.

Ingredients:

3 cups crumbled graham crackers (about 20 squares or 10 whole grahams)
2/3 cup sugar
12 Tablespoons better, melted

Directions:

Preheat oven to 350º

1. Crush graham crackers. 
2. While butter melts mix sugar into the graham crackers in a medium bowl.
3. Once butter has melted add it to the graham/sugar mixture. Mix with a fork until evenly combined.
4. Press into baking pan(s) or glass dish and bake for 7 minutes. Cool completely.


Strawberry Sauce        [Printable Recipe]

Ingredients:

15.5 ounce frozen strawberries, thawed
2 teaspoons Cornstarch
1 Tablespoon cold water

Directions:

1. Place thawed strawberries in a small saucepan and heat until simmer. 
2. Turn off burner and remove pan from heat. With a stick blender or regular blender…blend the strawberries until smooth.
3. Combine cornstarch and water in a small bowl.
4. Return strawberries to the saucepan and whisk in cornstarch/water mixture. 
5. Cook until thickened. 
6. Cool completely.


Simple Cheesecake        [Printable Recipe]

From: creande.com 

Recipe yields 2 cheesecakes or 1 9x13.

Ingredients:

  • 2 pre-made graham cracker pie shells or crust recipe (here)
  • 4 - 8 oz packages cream cheese, room temperature
  • 1 cup sour cream, room temperature
  • 3 eggs, room temperature
  • 1 cup sugar
  • 1 vanilla bean, seeds scraped or 1 teaspoon vanilla bean paste 
  • 2 teaspoons pure vanilla
  • 3 Tablespoons all-purpose flour


Directions:

  1. Preheat one to 350 and have a pan of water in the oven…see note below.
  2. In the bowl of a mixer combine the cream cheese, sugar, vanilla, and vanilla bean and beat until light and creamy. 
  3. Add the flour to the cream cheese mixture and beat until just smooth.
  4. Add the sour cream and beat until mixed well.
  5. Add eggs, one at a time, until just mixed.
  6. Pour the batter into prepared pie shells. 
  7. Bake for 1 hour to 1 hour 10 minutes. switch oven rack halfway through. Cheesecakes are done when the center is almost set. If the cheesecake starts to crack, it IS done! Not over done, it will still be fine, but it shouldn't crack.
  8. Let the cheesecake cool completely and the refrigerate for at least 4 hours. As hard as it may be to not eat the cheesecakes when cool, they MUST cool in the refrigerator.

Chocolate Drizzled Strawberry Cheesecake Square Tutorial


Steps 1 & 2: Cut the 2 short ends of the cheesecake off. These are curved and won't sit when you try to drizzle them. But! Don't discard them...EAT THEM! haha After that cut the cheesecake into three segments. 

Steps 3&4: Take the cheesecake, a segment at a time, and cut it into two with a hot knife. To get the knife hot, run it under hot water and shake, easily, off the water. Do this after each cut.

Steps 5&6: Cut the segment into quarters and then into 12 pieces.
Step 7: Line the counter with parchment paper. Place squares on a cooling rack. Prepare chocolate.

Step 8: Melt chocolate (I used Wilton Candy Melts)  over a pan of water on low heat.

Step 9: Once the chocolate has melted with a spoon drizzle chocolate over the squares. You can chose to drizzle in an direction. 


Monday, February 25, 2013

Honey Dijon Salmon and Lemon Zested Quinoa


A fast and healthy meal…Really?! 

Photos by PB

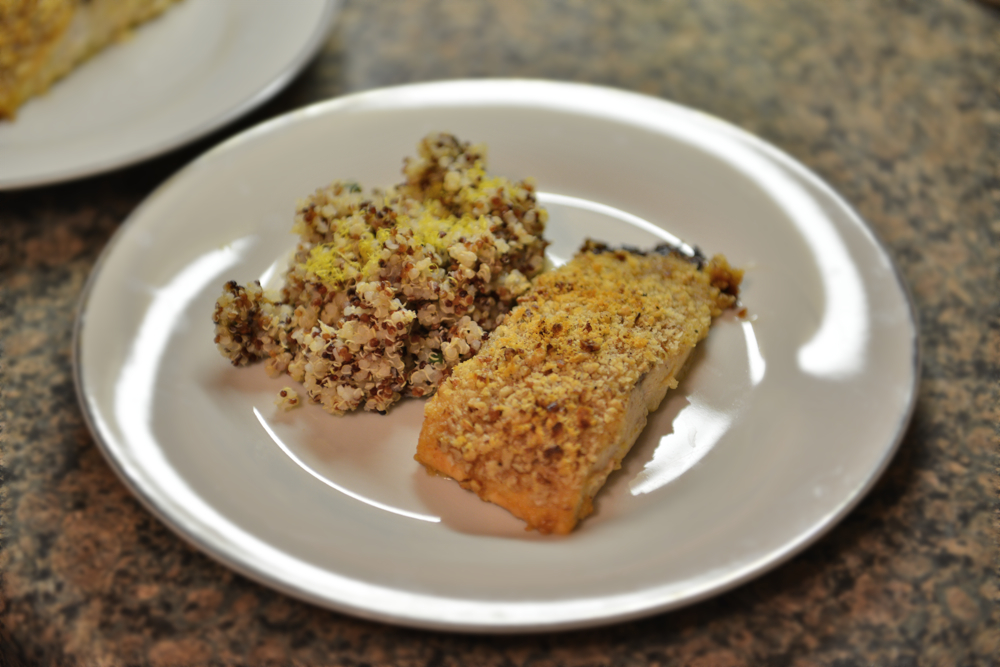
Yes! Really. Look at that beauty above. I promise it's delicious and it will take just over 30 minutes. No joke.

I came across a recipe that inspired this dish in a daily email I receive. It's been lying in the back files of my mind for a few weeks now. I had some company coming that motivated me to try out this recipe I had in mind. Said company is also the photographer so I had to feed him. ;-) 

Here are a few photos taken during the cooking process. 

That's me! Showing that lemon who's boss. - Photo by PB

Yum! - Photo by PB
Photo by PB

This dish is incredibly; simple, cost effective, delicious and healthy (if you substitute the Olive Oil for butter). From the photo above you can see how few ingredients and dishes there are. The process is simple as well. Coat the Salmon and sprinkle with bread crumb/pecan mixture. Pop it in the oven and you're good to go. While the Salmon cooks the Quinoa will cook in the same amount of time. All done at once and ready to enjoy!

Apply the breadcrumbs and press them in just a bit. Photo by PB
All ready to hit the oven rack and bake! Photo by PB

Now onto the Lemon Zested Quinoa. First, fresh lemon juice is one of my favorite scents and fresh lemon zest is one of my favorite flavors to finish a dish. There's nothing like smelling the fresh squeezed lemon or tasting that little pop of flavor from the finishing touch of zest. Second, Quinoa...What in the heck is Quinoa?!

That was my first reaction when I saw it start popping up on Food Network and in magazines. It always looked delicious, but I never knew what it was or how it tasted. A recent trip (my first time) to a Trader Joes gave me a chance to discover what it was. The most important thing to know about it is this...it's unique texture and light flavor are perfect. While its unique flavor is good, it's even better with a hint of lemon. I highly recommend giving it a try. It's a little pricy when you look at the amount you get, but trust me 1 cup cooked up makes a few healthy servings! 

A little more in depth: Quinoa (which is actually a seed, not a grain) is quite nutritional. It has a healthy serving of protein, essential amino-acids and is gluten/cholesterol-free. A healthier substitute for rice, be sure to check it out. 

Quinoa cooking. Photo by PB

Time to get cooking...Enjoy!


Honey Dijon Salmon and Lemon Zested Quinoa         

Honey Dijon Salmon

Ingredients:

4 Salmon fillets
1/4 cup butter, melted and cooled (or olive oil)
3 Tablespoons Dijon Mustard
2 Tablespoons Honey
1/4 cup Panko Bread Crumbs
1/4 cup chopped Pecans
Olive Oil
Pepper

Directions:

1. Use Olive Oil to grease a 9x13 pan and preheat oven to 400º.
2. In a small bowl mix Butter, Dijon Mustard, and Honey.
3. In another small bowl mix the Pankp Bread Crumbs, Pecans and Pepper (to taste).
4. With a brush apply honey/mustard mix to the bottom of the salmon and place in the pan. Brush the top of the salmon with the honey/mustard mix. 
5. Sprinkle, generously, the bread crumb mix over the salmon and lightly press onto salmon.
6. Bake for 15-20 minutes or until an internal temperature of 140º.


Lemon Zested Quinoa

Ingredients:

1 cup Tricolor or Regular Quinoa
2 cups water
juice of 1 Lemon
3 Green Onions (just the green)
Zest of one Lemon

Directions:

1. Be sure to wash the Quinoa before you use it. 
2. Mix the water and Quinoa in a medium saucepan and bring to a boil.
3. Once boiling, reduce heat and cook until tender, about 15 minutes.
4. After it's cooked add the lemon juice and onion. Remove from heat.
5. When ready to serve, top with Lemon Zest. Enjoy!

[Printable Recipe]

Friday, February 22, 2013

A sneak peek at the next post...

Coming Monday...Another quick and simple dinner. This one is healthy too!

Photo by PB

Honey Dijon Crusted Salmon and Lemony Quinoa

Wednesday, February 20, 2013

Apple Cranberry Muffin Tippy-Tops


Whether you have it set to music or an annoying sound I'm sure we all dread it just the same…the alarm clock. I especially hate it during these winter months. All I want to do is stay snuggled up in bed where it's warm. 

Since I can't do that all the time, I keep my mind in a happy place with coffee and treats to wake up to. It helps. There really is nothing better to wake up to than a nice hot, slightly sweet cappuccino and a spicy, slightly sweet breakfast on these winter days. If you can't tell, I don't like the cold. You think by this time in my life (I've grown up here in Indiana) that I'd be used to it by now. I'm not. I survive because I love my winter coat and scarf. haha Coffee in hand and I'm ready to tackle the day, most of the time. ;-)


To accompany my coffee I always have some kind of breakfast. These Apple Cranberry Muffin Tippy-Tops are a perfect accompaniment to coffee on a cold winter day. With their warm spice blend and toasty bits of apple and cranberry, they warm your soul and hands as you indulge. Just like the Banana Maple Muffin Tippy-Tops these are the perfect breakfast on the go. They also freeze well and pop in the toaster easily. 

Without further ado…


Apple Cranberry Muffin Tippy-Tops
adapted from: goodlifeeats.com


Makes: 24 tippy-tops

Ingredients:

4 cups all-purpose flour
1 cup old fashioned oats, heaping
1 cup sugar
1/4 cup dark brown sugar
3 teaspoons baking power 
2 teaspoons baking soda
1 teaspoon salt
4 heaping teaspoons cinnamon
3 dashes allspice
1/4 teaspoon nutmeg
4 eggs
2 cups buttermilk or substitute
2 sticks (1 cup) butter, melted and cooled
4 large GrannySmith apples, finely cut
1/2 cup dried cranberries
1/2 pecans

Directions:

1. Preheat oven to 350 and grease muffin top/whoopie pie pan.
2. In the bowl of a mixer whisk together the dry ingredients.
3. In a separate bowl combine the eggs, buttermilk and butter.
4. Lightly mix the wet ingredients into the dry. Fold in the apples just until mixed in. 
5. Fold in the cranberries and pecans just until mixed in.
6. Spoon into pans evenly and bake 10-12 minutes.
7. Serve warm and enjoy!

Monday, February 4, 2013

Simple Homemade Pasta Sauce - A quick dinner idea.


Life continues to be busy around my little world. While I am a big cook and I love it, there are nights I just don't have the time or energy. With simple and quick recipes like the one I share now, it makes it much easier to cook on those extra busy days. I am aiming at making more simple and quick meals for myself. No more of that fast food or pre-made meals. I figured with the busy schedule being a common thing, I might as well share my adventure and the recipes. 

Saturday, February 2, 2013

Elmo Birthday Cake

Here is the latest cake I made. Elmo is made from Rice Krispy Treats and Royal Icing. He was a challenge, but it all came together well in the end.


Sunday, January 20, 2013

Banana Maple Muffin Tippy-Tops


Breakfast on the go is how I roll. 

On my work days I'm usually up in plenty of time to enjoy coffee and breakfast, but I never do. For whatever reason I have my coffee but don't eat breakfast. I get lost online with email, Facebook, and YouTube instead of focusing on the most important meal of the day. So, I'm rushing last minute to grab breakfast on my way out the door. I usually end up with nothing in hand when I leave. One gets tired of toast, toaster pastries and the like. It was time to start brainstorming!

My first thought went to muffins because they are simple, delicious and easy to carry. One problem for driving, the crumbs. One night I was reaching in the cabinet for a pan to make din and saw the Whoopie Pie/Muffin Top pans (which I don't use for Whoopie Pies) I have. I had one of those Aha! moments! The next day I started searching for recipes for muffins. I knew I wanted Banana to be the focus and then I cam across this Banana Maple Muffin recipe. I knew it was love at first site. haha 

The recipe below is the one I came up with after the second time making them. The first batch turned out delicious, but they were a little tough. I decided I had to test the recipe with different alterations and then share it. They came out near perfect. The key the second time was how I folded the batter rather than mixing. I can't express enough how lightly you have to mix the batter. That is how you get the right texture in the final product. I also altered the amount of banana, I wanted just a little more flavor. A changed/added a few other ingredients as well. All resulting in a near perfect breakfast to go. 

I've included some step by step photos and then the recipe. Also, these work great from the freezer. I pop them in the toaster and off I go. They heat well in the microwave too, just a few seconds and they're good to go. 


Whoopie Pie/Muffin Top Pan

The finished batter.

Be sure to spread the batter out in each section.

Fresh from the oven!


Banana Maple Muffin Tippy-Tops
adapted from: bakingbites.com

Makes 20 tippy-tops

Ingredients:

2 1/4 cups all-purpose flour
1 tsp baking powder
1/2 tsp baking soda
1/4 tsp salt

3 bananas, mashed
3 Tbsp vegetable oil
1 large egg
1/4 cup light brown sugar
1/2 cup Real maple syrup
1 tsp pure vanilla
1/2 tsp maple flavoring


Directions:

Place oven rack in the center. Preheat over to 350º and grease pans. 

1. In a medium bowl whisk together flour, baking powder, baking soda, and salt.
2. In a large bowl mash bananas. Once mashed add the remaining ingredients and whisk until mixed. 
3. In three batches lightly FOLD in the flour mixture. Do NOT over mix. It's ok if there is still a few streaks of the flour mixture. If you over mix the muffins will be tough. Fold, fold and fold.
4. Scoop a few tablespoon of batter in each section of the pan, flattening to cover the whole section. 
5. Bake for 10 minutes. Cool and enjoy!


Monday, January 14, 2013

Asparagus Mushroom Browned Butter Alfredo

Pasta, Vegetables, Heavy Cream and Cheese…sounds like a great dinner to me.


As you can see, a great dinner it was. 


At first bite, I decided this was a recipe that I just had to share. While I've tried to start gearing the blog back to the sugary treats, I can't help but share some of my savory dishes. In fact, I may start doing it more. After all, this IS a food blog about MY culinary journey.

Anywho, back to this deeeelicious dish. I had a craving for some fresh vegetables and pasta which led to this recipe. As I was thinking of what to make I figured why not throw them in some alfredo sauce. I've made an Alfredo sauce before, but I thought it was a bit heavy and missing something. I searched around the net at various recipes. I found it hard to settle on just one or find any real inspiration from what I did find. So, that made me get off my toosh and get in the kitchen and create my own. 

While I was in the midst of creating this recipe there was a slight, or so I thought, mishap with my favorite ingredient...Butter. I LOVE butter. When you sauté with butter, you must watch it…I didn't. When I turned back to the stove (I was chopping veggies. Be sure to do this step before you start cooking. haha) the butter had brown, verging on quickly becoming burnt butter. Thank goodness I had ninja reflexes and saved the butter. It had browned just enough to add that extra layer of flavor to the final sauce. Lessons learned and a better dish from a little scare. 

This recipe is very simple and quick. I urge you to give it a try and leave comment on your own cooking experience. Here's the recipe...


Asparagus Mushroom Browned Butter Alfredo
makes 3 servings

Ingredients:

2 Tablespoons Olive Oil
1 medium onion, chopped
1 clove garlic
8 oz mushrooms, sliced
1 cup fresh asparagus, cut
1/4 cup butter
1 cup heavy cream
1 1/2 cups Parmesan, shredded
1/4 cup Applewood Smoke Gruyere cheese, shredded
2-3 teaspoons dry parsley (1/4 cup fresh)
salt and pepper to taste
8 oz dry pasta (I used Fiori)

Directions:

1. Bring a saucepan of water to a boil. Salt and add pasta. Cook until al dente. 
2. Heat oil and add onions. Cook until almost translucent, then add mushrooms and garlic. Cook until liquid from mushrooms is reduced. Add Asparagus and cook until asparagus is just tender.
3. In a medium saucepan cook butter until browned, then add cream. Bring to a simmer then add Parmesan. Cook until melted. Add the Gruyere and cook until melted. Add parsley, salt and pepper. 
4. Assemble; place pasta in a bowl, add a layer of vegetable, and top with sauce. Enjoy!


OH AND Breadsticks! I didn't alter the ingredients in the recipe I found here from Over The Big Moon. I did, however prepare mine in two different ways. I made one large loaf after a little kneading and cut it into strips. I then twisted each strip a little and placed them, spaced apart, in a pan. To add some flavor I melted butter with garlic and parsley. I then brush the mixture on the dough just before placing in the oven. With 10 minutes left to bake I sprinkled the breadsticks with shredded Parmesan.